sSDR module
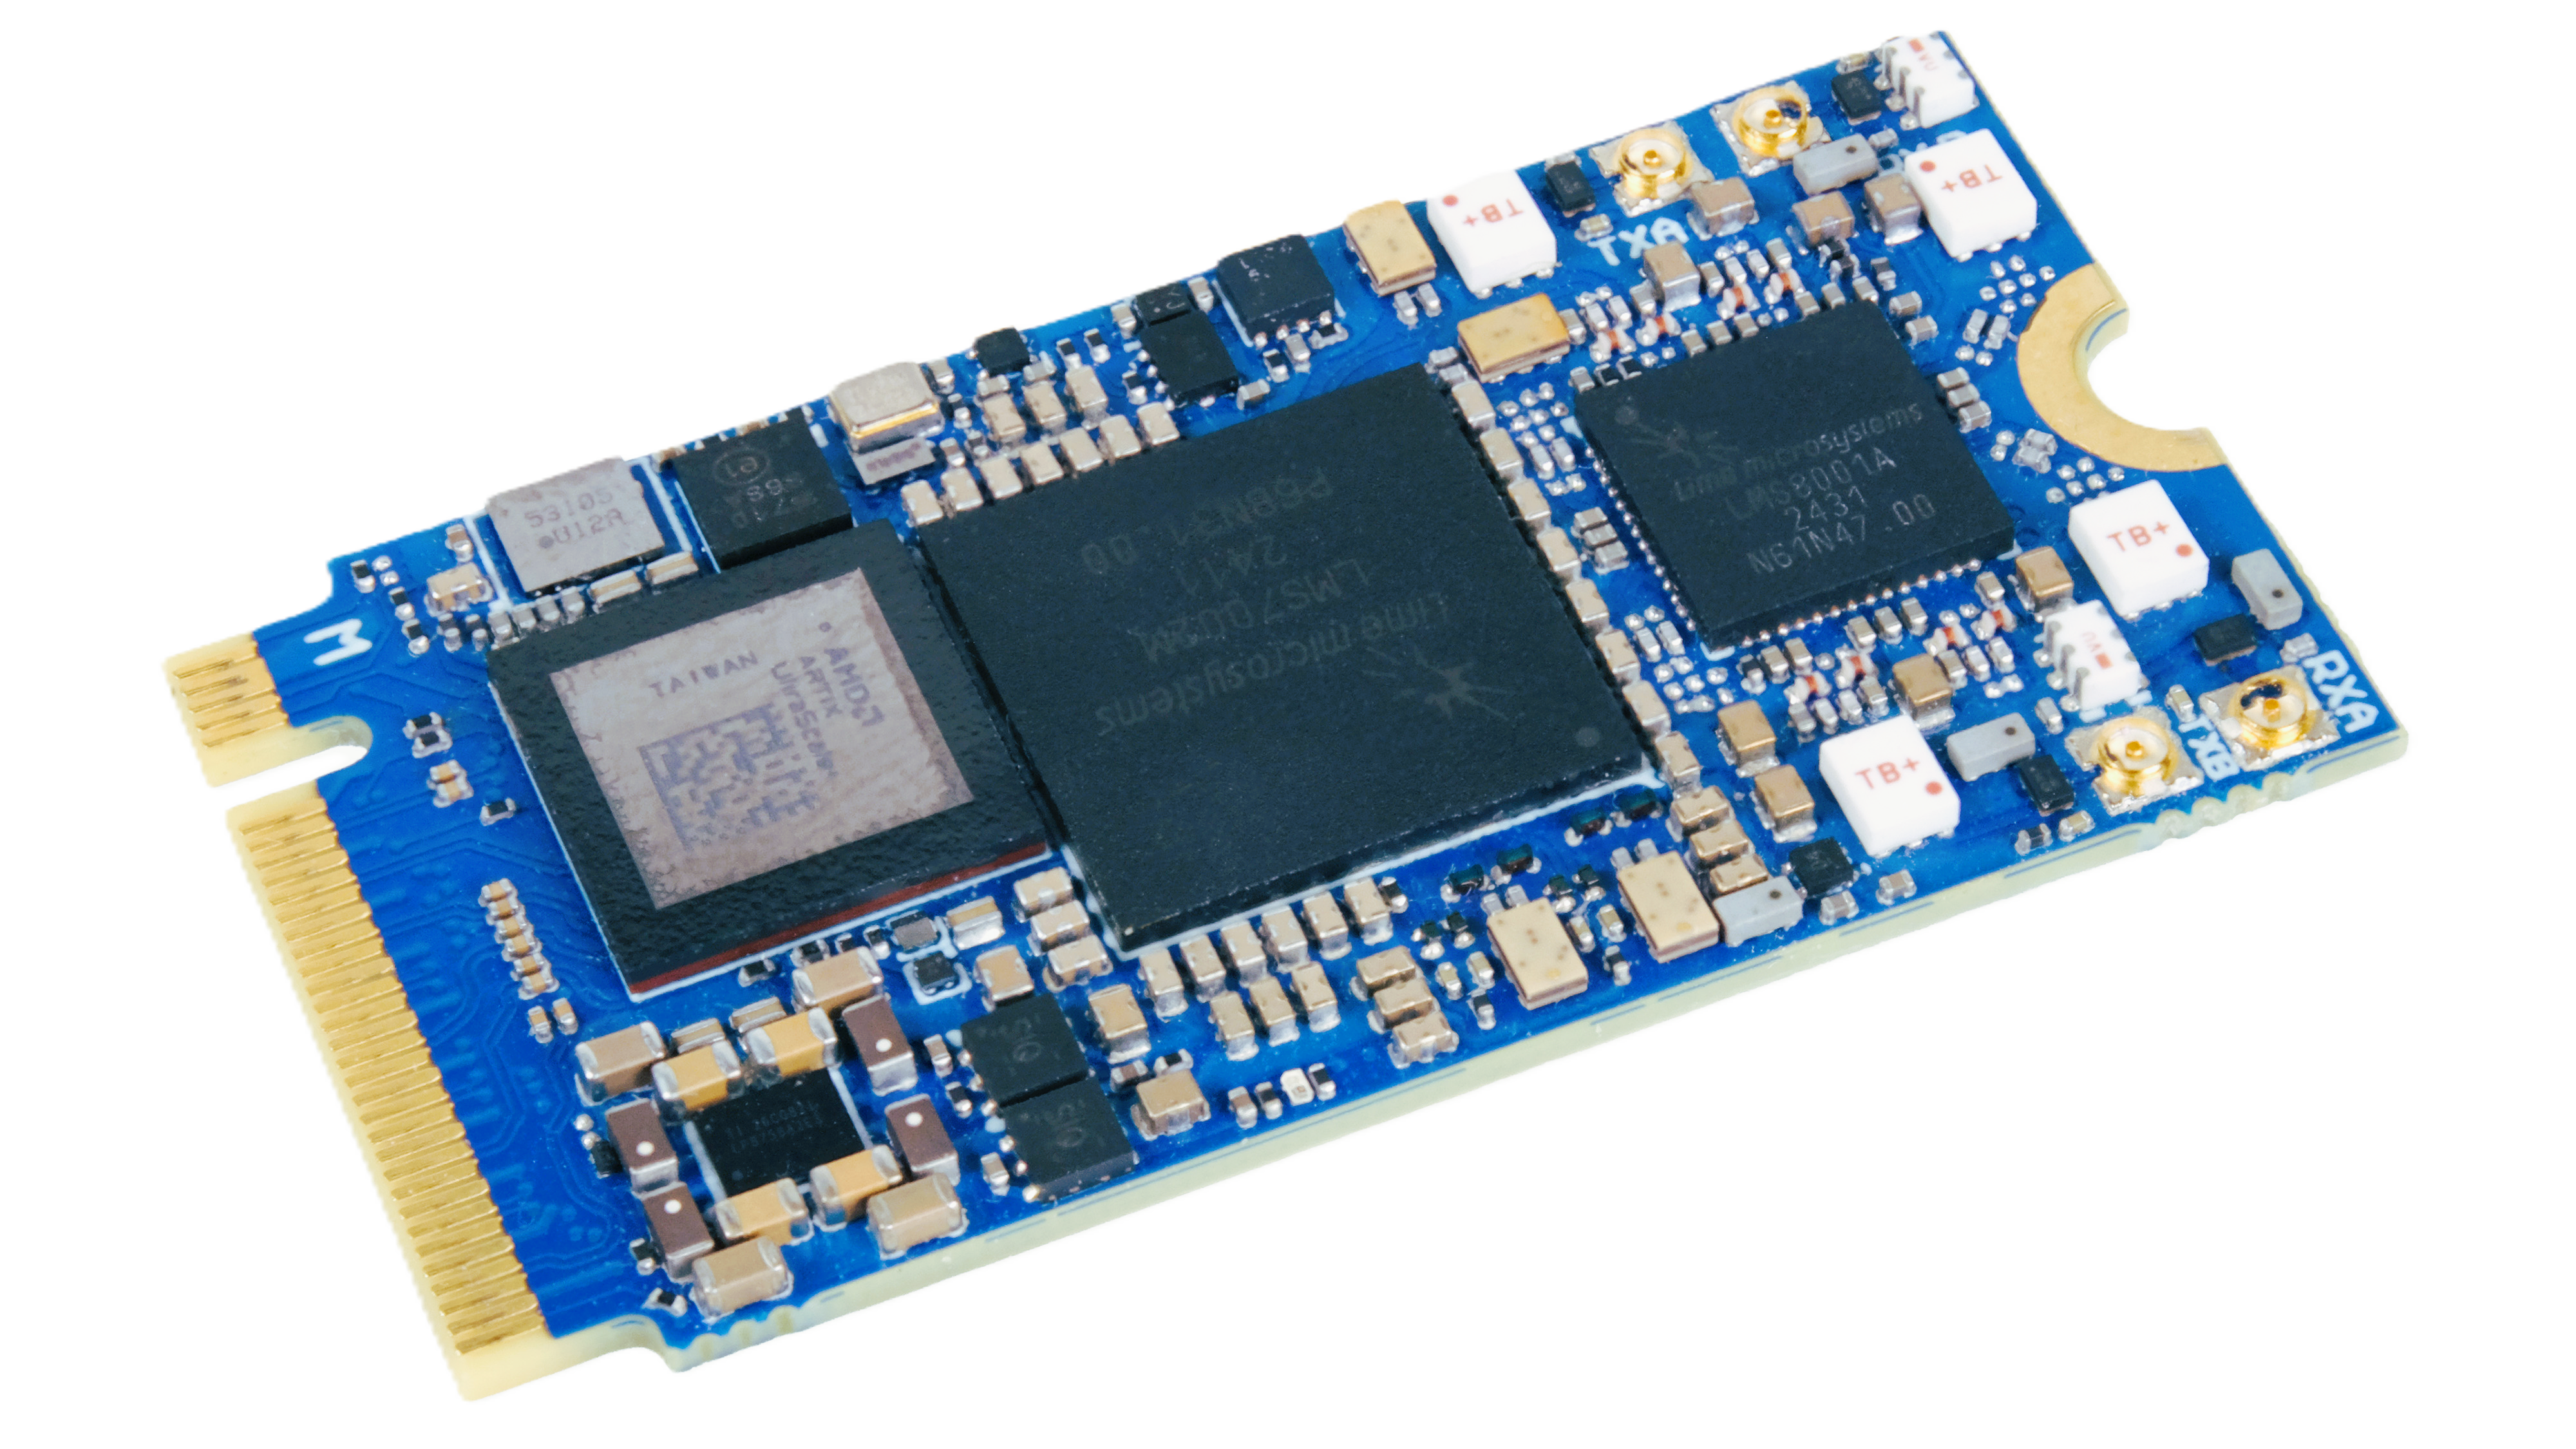
A compact M.2 software-defined radio (SDR) with 2 RX/TX channels, single-sided components, and an extended frequency range.
Introduction
The sSDR is a compact M.2 software-defined radio card with an expansive RF range from 30 MHz to 11 GHz, covering 5G (7.125 GHz), the latest WiFi, radio links, and many more applications.
Paired with wsdr.io and various host devices, it enables the rapid development of custom RF solutions.
General Specifications
- FPGA
AMD XC7A50T (Rev2)
AMD UltraScale+ XCAU7P (Rev3)
- Power Consumption
2.9W Typical
5.5W Max
- Interface
M.2 2242 B+M key (PCIe 2.0 x2 + USB 2.0) (Rev2)
M.2 2242 M key (PCIe 3.0 x4 + USB 2.0) (Rev3)
M.2 2242 form factor: Width: 22 mm X Length: 42 mm X Thickness: ~3mm
- Extended Power Supply Range
2.85 - 5.5 V
- External Clock Synchronization
Synchronize multiple boards for a multi-channel array
RF Specifications
- RFIC
LMS7002M + LMS8001
- Frontend
Integrated high-pass and low-pass filters for Hi / Lo RX bands
- Frequency Range
30 MHz to 11 GHz
- Sample Rate
0.1 MSps - 86 MSps (MIMO)
122.88MSps (SISO)
- Channel Bandwidth
0.5 MHz - 120 MHz (MIMO)
122.88MSps (SISO)
- RF cable connectors
MHF 7S
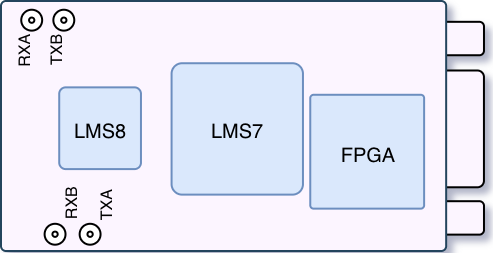
Pinout
Target Applications
- Cellular Communication
Establish dedicated wireless networks by implementing eNodeB or gNodeB systems via open-source solutions like srsRAN (4G/5G) or Amarisoft
Build dedicated high-frequency radio links
- X-Band
X-band around 10.5 GHz occupies a “sweet spot” in the RF spectrum where multiple physical and practical advantages align
Widely used in radar, remote sensing, communications, instrumentation, and advanced radiolocation systems due to its high resolution
- Embedded
Develop compact and high-performance frequency-analysis devices
- Data Link
Build communication channels between points worldwide through a web-enabled platform
Measurements
This section contains RF measurements for SSDR board.
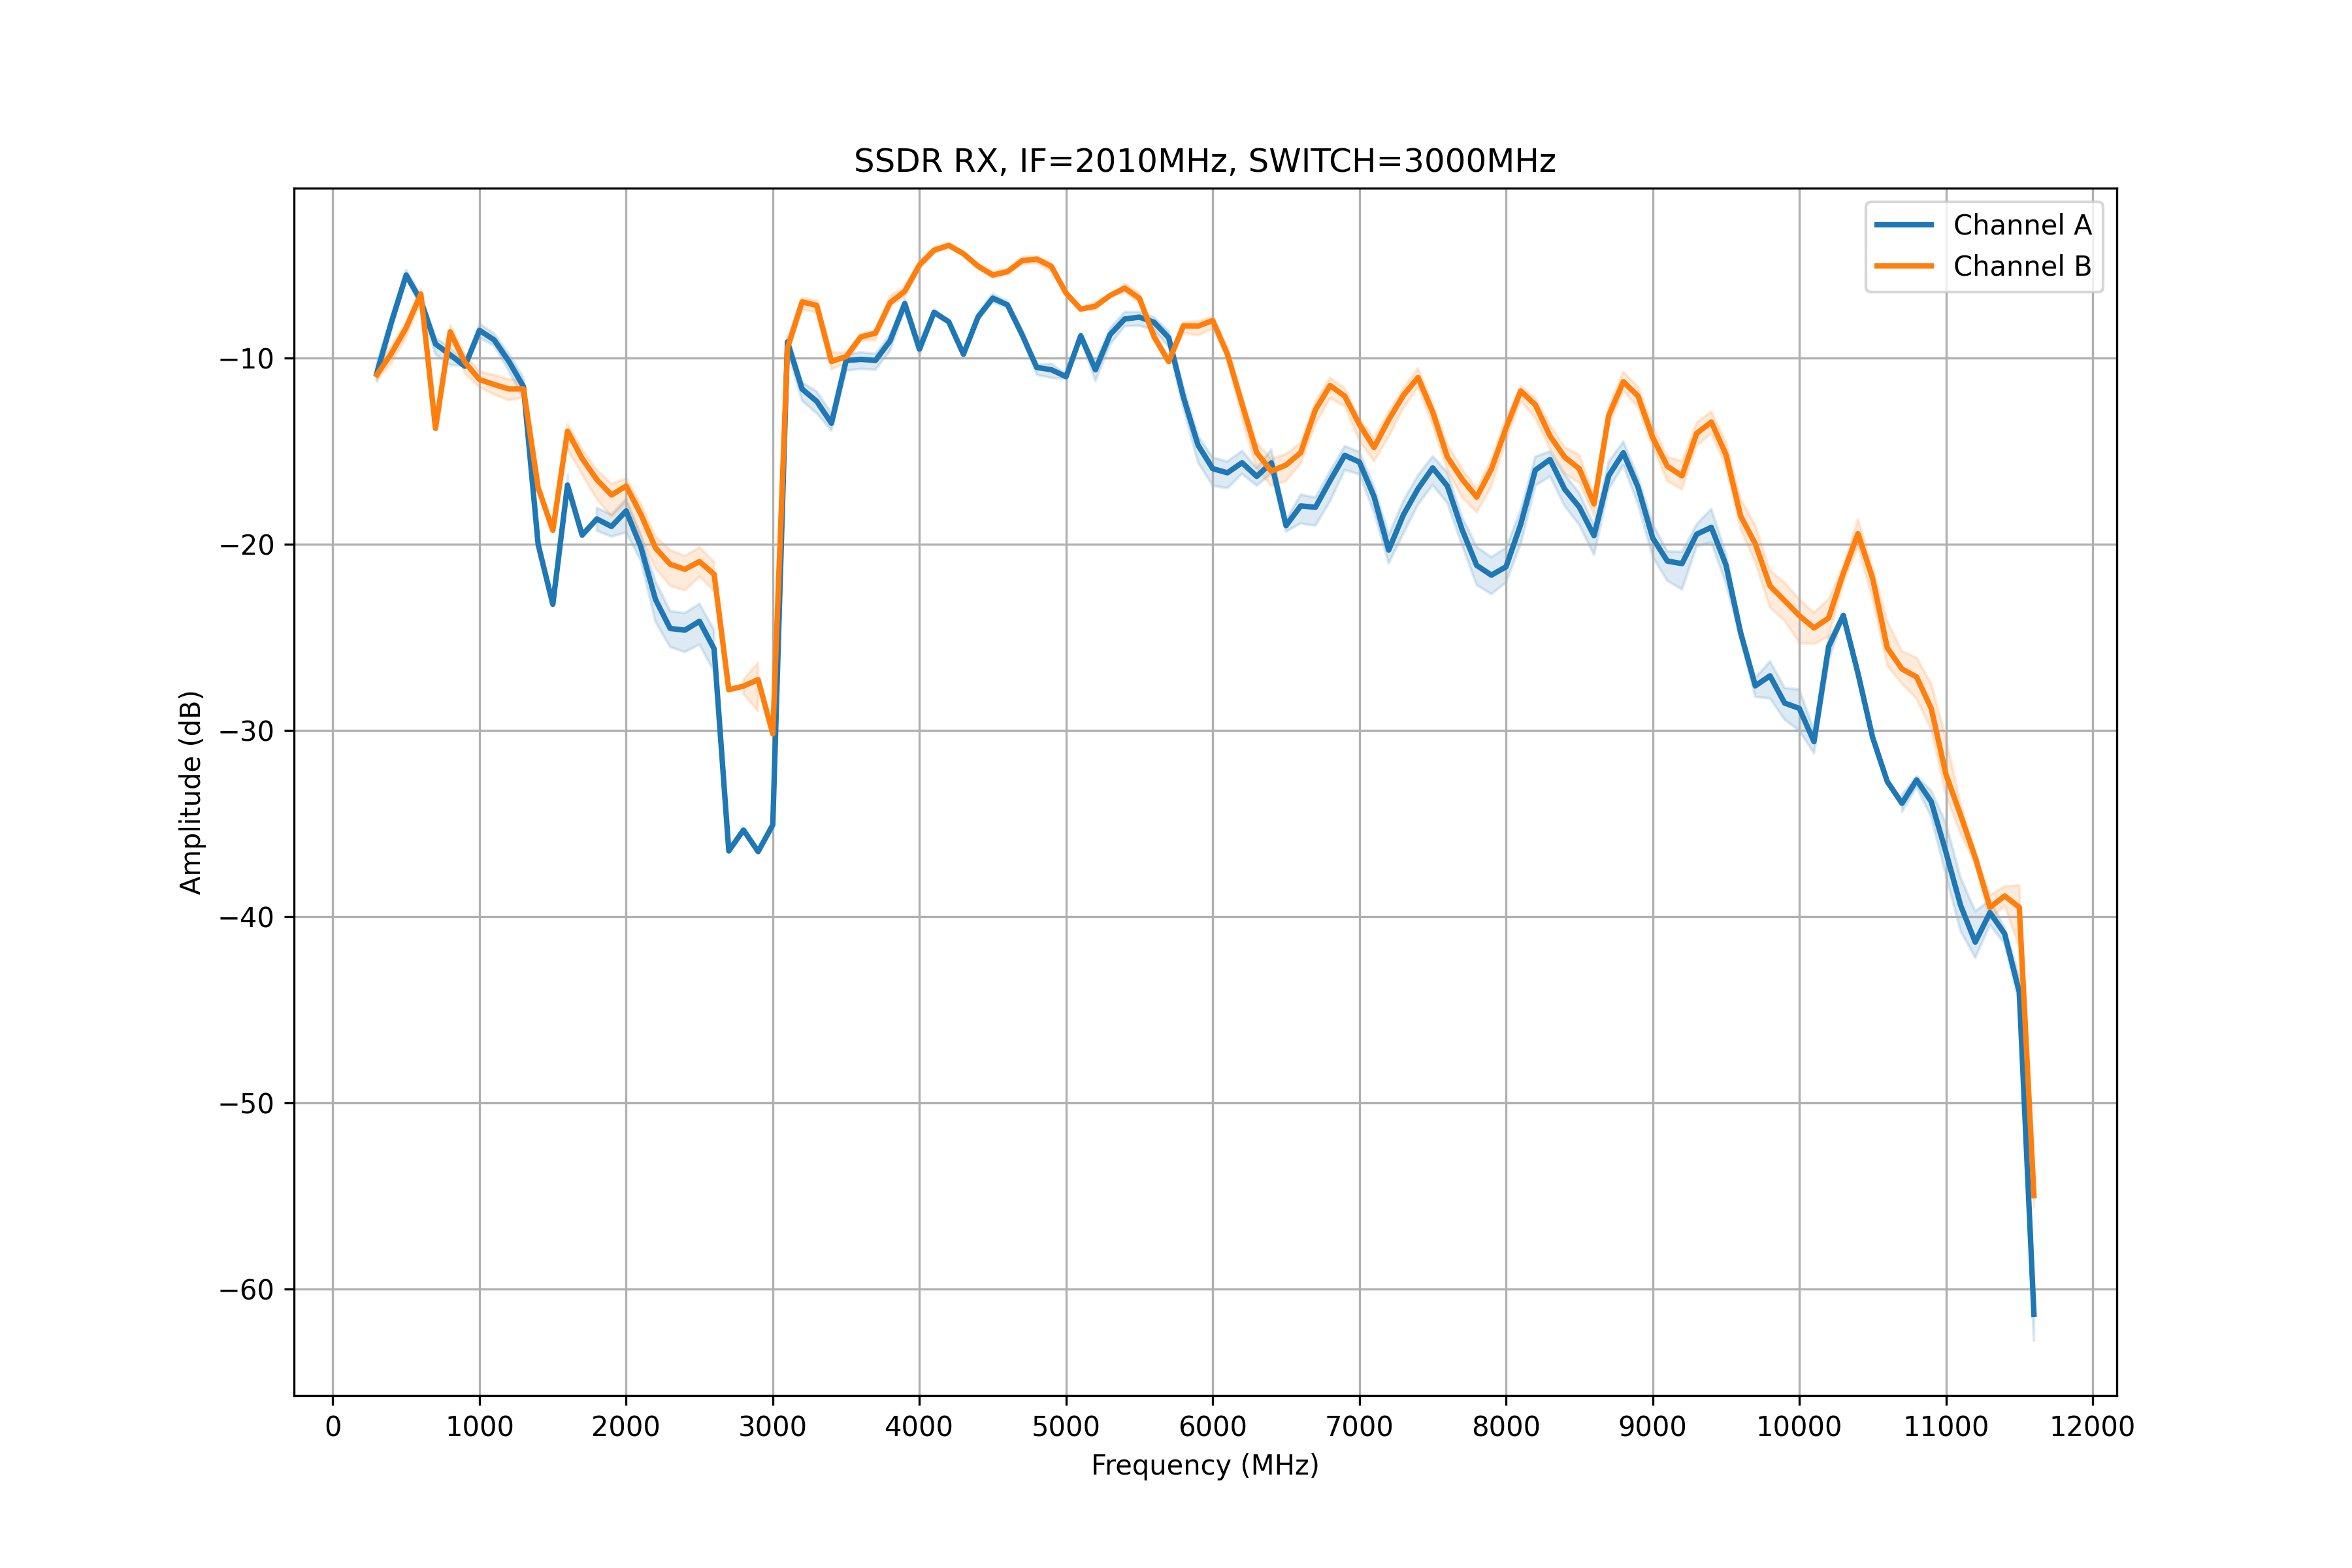
Parameters of RX measured at 2010 MHz IF, with the switchover frequency set to 3000 MHz.
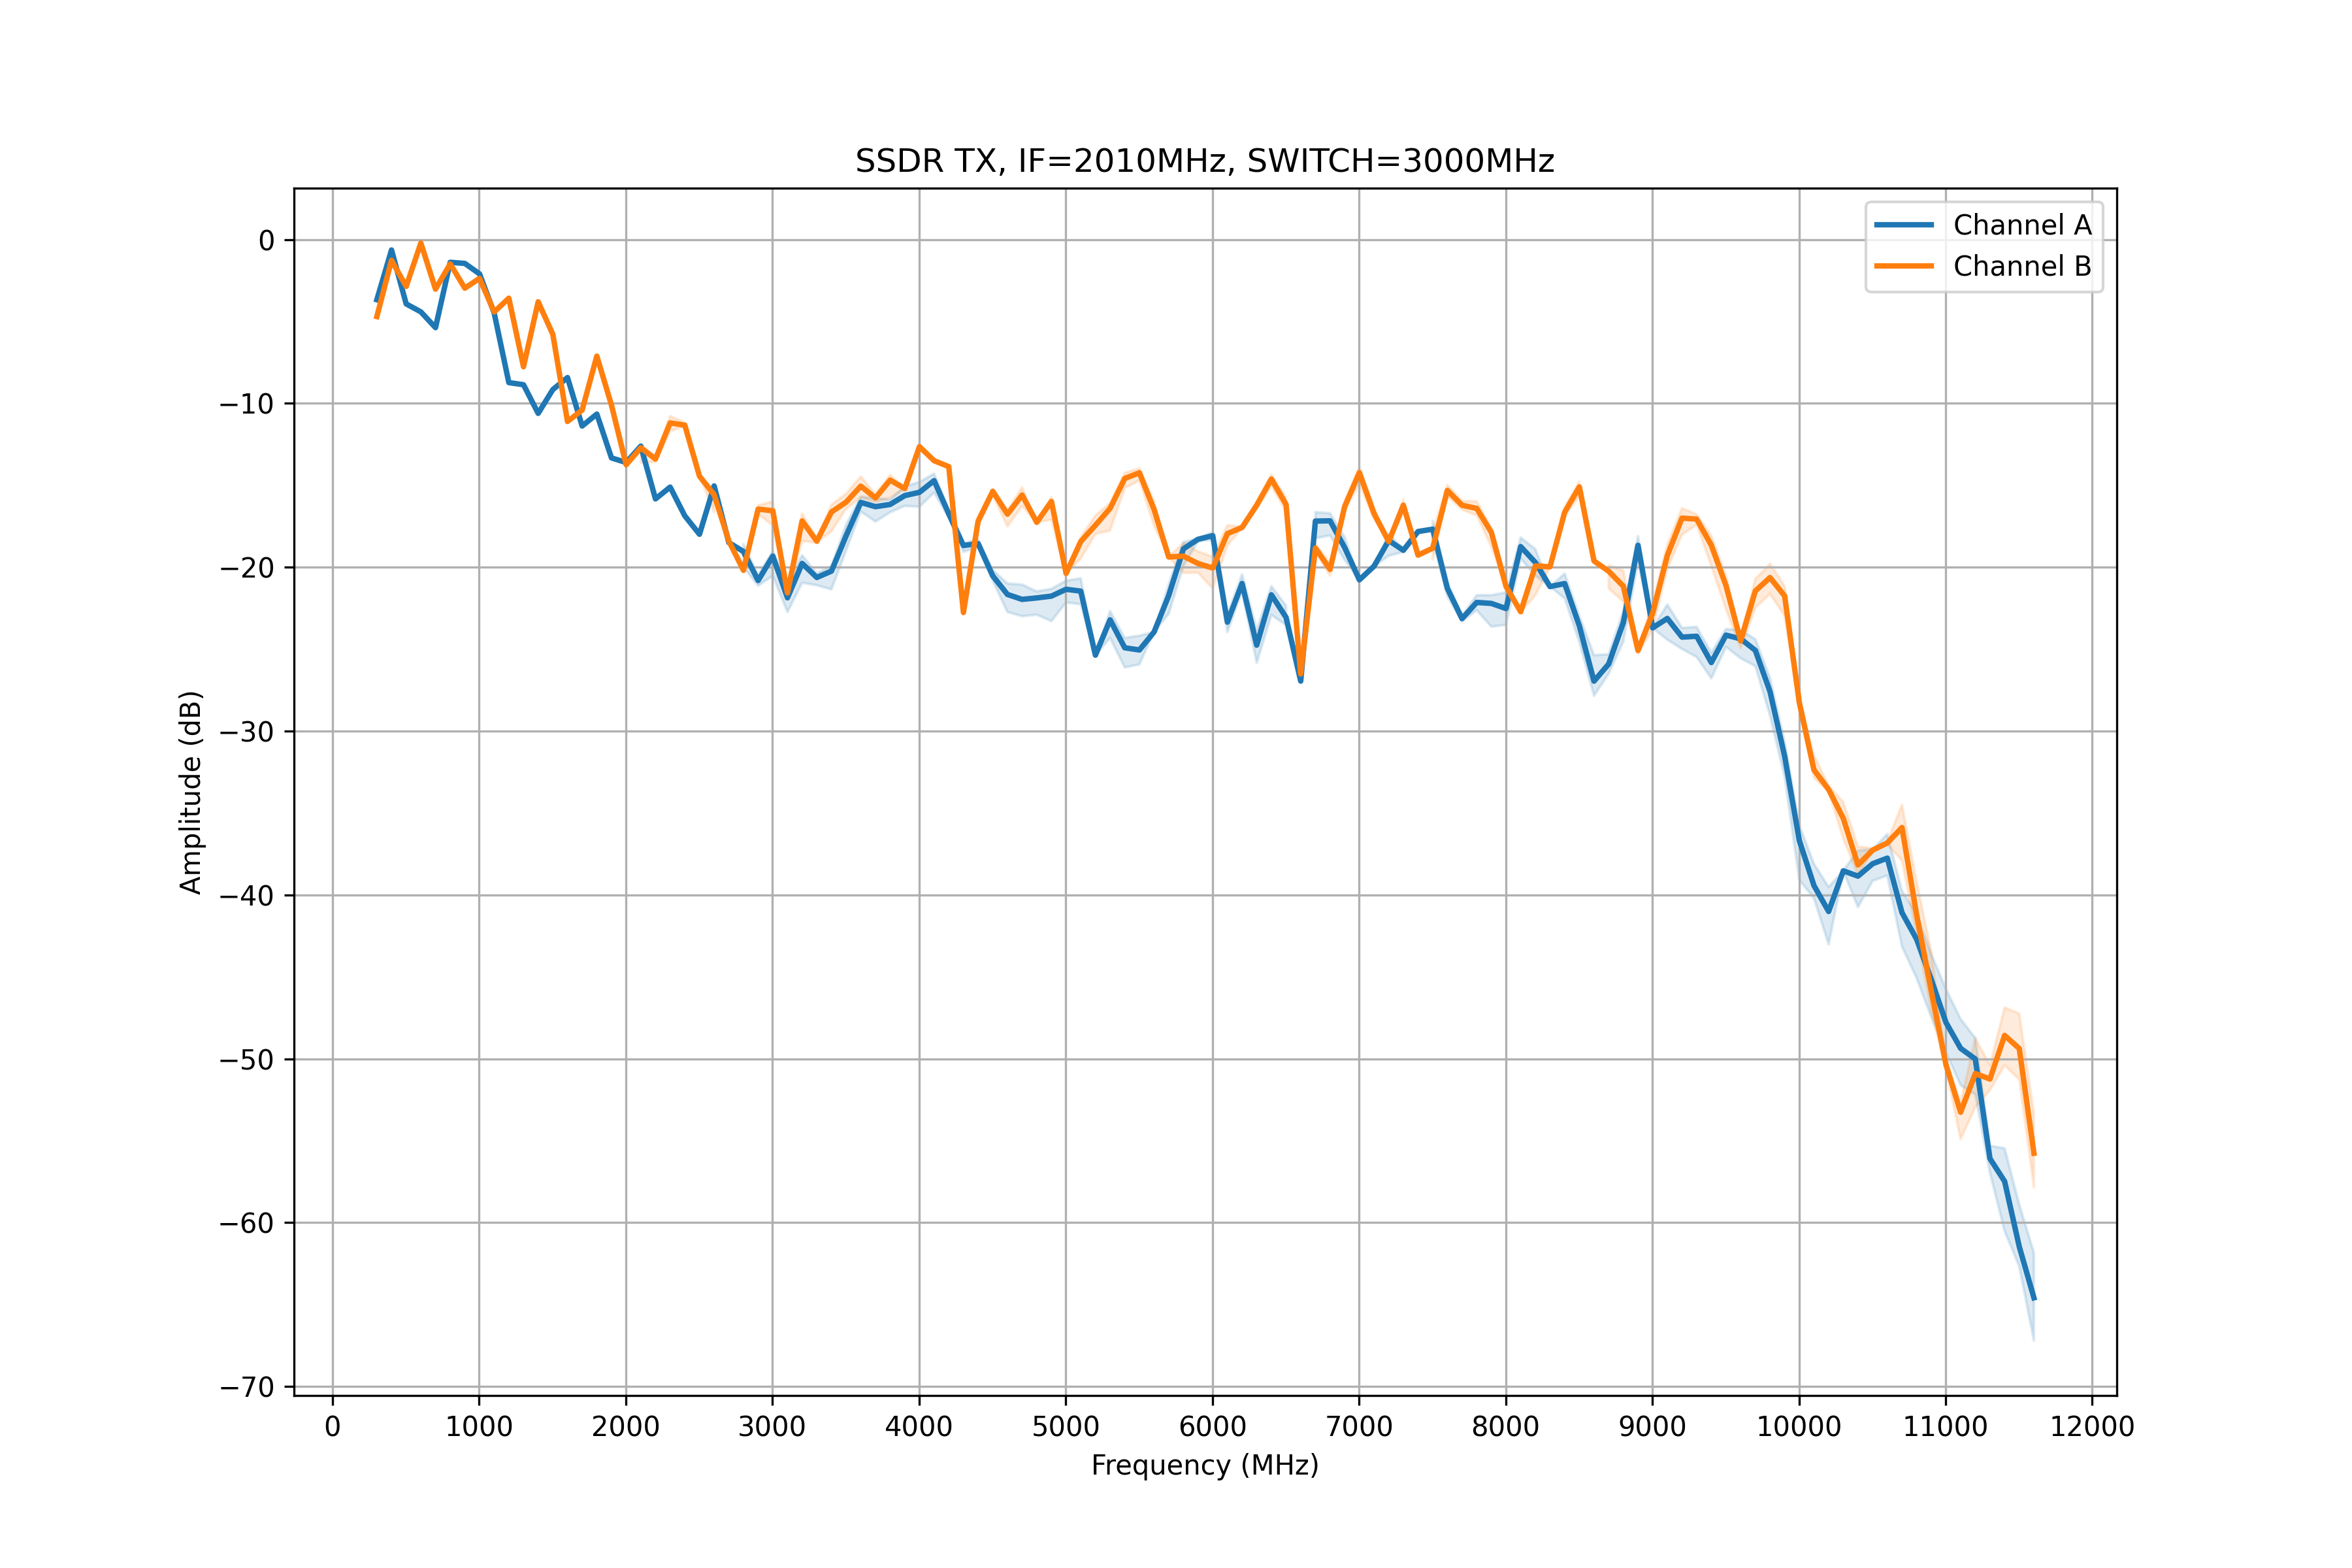
Parameters of TX measured at 2010 MHz IF, with the switchover frequency set to 3000 MHz.
Getting Started
The sSDR requires a newer version of the software than the standard package release.
To ensure proper operation, build usdr-lib from source using the
feature_pe_sync branch, install the kernel driver, and verify operation
using SoapySDR or the usdr_dm_create tool.
This guide covers:
Building the software from source
Installing the kernel module
Installing the SoapySDR plugin
Verifying the device
Capturing your first RF signal
Software Stack
The sSDR operates using the following software stack:
SDR Applications
(CubicSDR / GNU Radio / Gqrx / custom apps)
        │
        ▼
SoapySDR USDR plugin
(soapysdr-module-usdr)
        │
        ▼
usdr-lib
        │
        ▼
Kernel driver
(usdr_pcie_uram)
        │
        ▼
sSDR hardware
1. Clone the Repository
Build the required software from the feature_pe_sync branch.
git clone https://github.com/wavelet-lab/usdr-lib.git
cd usdr-lib
git checkout feature_pe_sync
2. Install Dependencies
Ubuntu 20.04 / 22.04 / 24.04, Debian 12, Raspberry Pi OS:
sudo apt install -y build-essential cmake python3 python3-venv python3-yaml dwarves
sudo apt install -y libsoapysdr-dev libusb-1.0-0-dev check dkms
3. Build the Software
Standard build:
mkdir build
cd build
cmake -DCMAKE_INSTALL_PREFIX:PATH=/usr ../src
make -j$(nproc)
sudo make install
Debug build (optional):
mkdir build
cd build
cmake -DCMAKE_INSTALL_PREFIX:PATH=/usr -DCMAKE_BUILD_TYPE=Debug ../src
make -j$(nproc)
sudo make install
4. Enroll the MOK Key
This step is required only on Secure Boot systems so the kernel module can be loaded.
sudo apt-get install -y shim-signed mokutil
sudo update-secureboot-policy --new-key
sudo update-secureboot-policy --enroll-key
The utility will ask you to create a password.
After that:
Reboot the system
The BIOS/UEFI interface will prompt you to enroll the key
Select Enroll key
Enter the password you created
This step only needs to be performed once.
5. Build and Install the Kernel Module
Install kernel headers:
sudo apt install -y linux-headers-$(uname -r)
Build the driver:
cd ../src/lib/lowlevel/pcie_uram/driver/
make
Sign the module (Secure Boot systems):
sudo kmodsign sha512 \
/var/lib/shim-signed/mok/MOK.priv \
/var/lib/shim-signed/mok/MOK.der \
usdr_pcie_uram.ko
Load the module:
sudo insmod usdr_pcie_uram.ko
Install udev rules:
sudo cp ./helpers/50-usdr-pcie-driver.rules /etc/udev/rules.d/
6. Install the SoapySDR Plugin
Install the SoapySDR USDR plugin.
sudo apt install -y soapysdr-module-usdr
Verify that the device is detected:
SoapySDRUtil --find
If installation is correct, the USDR / sSDR device will appear in the list.
7. First RF Capture
The usdr_dm_create tool can be used to verify that the device is working
correctly.
Example: capture RF samples at 1200 MHz.
usdr_dm_create -r4e6 -e1200e6 -c100000 -f test.iq
This command:
sets the sample rate to 4 MSPS
tunes to 1200 MHz
captures IQ data
saves the result to
test.iq
8. View the RF Spectrum
Launch CubicSDR:
CubicSDR
Then:
Select the USDR / sSDR device
Ensure the sample rate is at least 8 MHz
Press Start
You can now tune frequencies and observe the RF spectrum.
9. Troubleshooting
Device not detected
Run:
SoapySDRUtil --find
If no device appears:
verify the kernel module is loaded
check the hardware connection
reboot after Secure Boot enrollment
verify udev rules were installed
Module fails to load
Ensure kernel headers are installed:
sudo apt install linux-headers-$(uname -r)
Spectrum shows only noise
Verify:
antenna is connected
correct frequency is selected
gain settings are appropriate
sample rate is at least 8 MHz
10. Quick Start Summary
For experienced users:
git clone https://github.com/wavelet-lab/usdr-lib.git
cd usdr-lib
git checkout feature_pe_sync
mkdir build && cd build
cmake -DCMAKE_INSTALL_PREFIX:PATH=/usr ../src
make -j$(nproc)
sudo make install
sudo apt install -y soapysdr-module-usdr
SoapySDRUtil --find
usdr_dm_create -r4e6 -e1200e6 -c100000 -f test.iq